How to set up an MCP server for AI assistants [EASY 2026 GUIDE]
The need to set up an MCP server
The current landscape of Artificial Intelligence is powerful, yet many users find themselves limited by a crucial missing link: context. If you use standard AI assistants, they lack direct access to your local environment. They cannot “see” your project files, your private databases, or your unique notes unless you manually paste that information in. This is the exact pain point the Model Context Protocol (MCP) was designed to solve.
It provides a standardized way to connect your local data sources to an AI model, essentially giving the model a secure window into your machine’s relevant data. In this guide, we will walk you through the process of setting up an MCP server, allowing your AI assistants to provide far more relevant and informed responses based on your actual data.
How to set up an MCP server
Setting up an MCP server may sound complex, but the process is straightforward once you understand the basic components. This guide assumes you have a basic understanding of using a command-line interface and have Python installed. The core concept is to create a server that your AI assistant can query. This server will know how to access and retrieve data from your defined local sources. We will be using the reference implementation provided by the MCP project.
Step 1: Install the MCP Python SDK
The first step is to install the necessary tools. You can do this easily using pip, the Python package installer. Open your terminal and run the following command:
pip install mcp
This will install the Model Context Protocol SDK, which provides the library needed to build and run your server. Ensure you have the latest version to avoid compatibility issues.
Step 2: Create Your Server File
Now you need to write a simple Python script to act as your server. Create a new file, for example, my_mcp_server.py. This script will define the “tools” and “resources” that your AI can access.
Here is a basic template you can use:
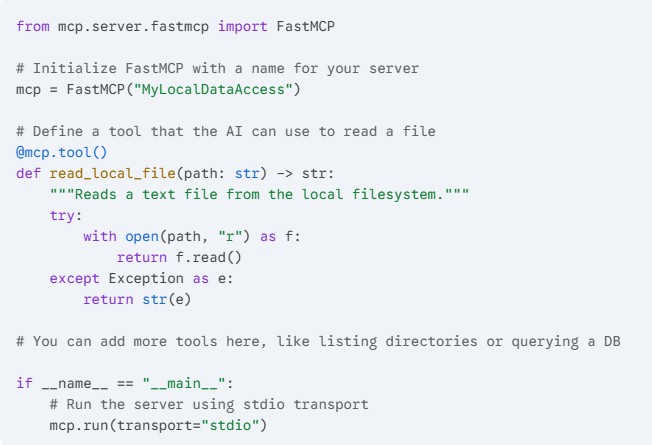
This simple script sets up an MCP server named “MyLocalDataAccess” and creates a single tool (read_local_file) that your AI assistant can call to read text files on your machine. The mcp.run(transport="stdio") line is crucial, as it tells the server to communicate using standard input/output, which is how many AI assistant clients interact with local servers.
Step 3: Configure Your AI Client
This step depends heavily on which AI assistant you are using. Leading developer-focused AI tools now have native support for MCP. For example, in the Claude Desktop app, you can add your MCP server through the configuration file.
On macOS, this file is located at ~/Library/Application Support/Claude/claude_desktop_config.json. On Windows, it is at %APPDATA%\Claude\claude_desktop_config.json.
Open this JSON file and add your server configuration. If the file doesn’t exist, you must create it. The structure should look like this:
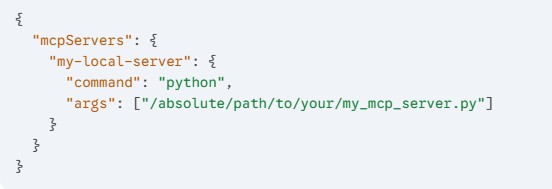
Make sure you replace /absolute/path/to/your/my_mcp_server.py with the actual full path to the Python file you created in Step 2. Using absolute paths is highly recommended to avoid any confusion.
Step 4: Verify and Start Using
Once you have saved the configuration file, you typically need to restart the AI assistant client (e.g., restart Claude Desktop). After restarting, look for a visual indicator in the interface that confirms the MCP server is connected. In Claude, this is often a small plug icon.
You can now start interacting with your assistant and utilize the tools you defined. For instance, you could ask: “Can you summarize the contents of the file located at /Users/yourname/Documents/project_notes.txt?”
If your setup is correct, the AI will use the read_local_file tool from your MCP server to access the specified file and generate the summary.
You have successfully set up and connected your own MCP server to an AI assistant. This is a significant first step toward creating a truly powerful and customized AI workflow. By defining more complex tools in your Python script, you can expose databases, local code repositories, or other web APIs to your AI model. You have moved beyond simple generic chat and are now working with an assistant that understands your personal data landscape.
Thank you for following this guide. We hope the process was smooth and that you find this new capability highly useful. Be sure to stay tuned to our website for more practical guides on AI integration and advanced developer workflows. Please consider sharing this post with colleagues who are looking to enhance their AI tools.