
How to free up disk space on Windows without losing your files

How to free up disk space on Windows
Have you ever tried to save a photo or install an update, only to be told your disk is full? You are not alone. Between apps, games, downloads, photos and random system files, it does not take long for a Windows computer to fill up. The tricky part is figuring out what is actually taking up all that room, so you do not end up deleting something you need just to make space.
The good news is that Windows already has a built in tool that shows you exactly where your storage is going. Once you can see the full picture, you can clear out the biggest space hogs first, instead of poking around random folders and hoping for the best.
Start with windows storage settings
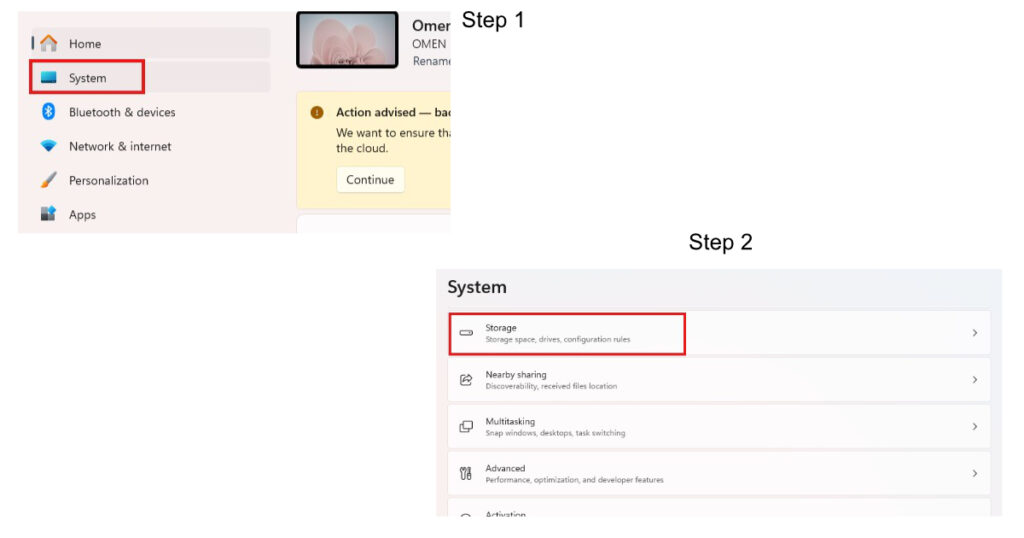
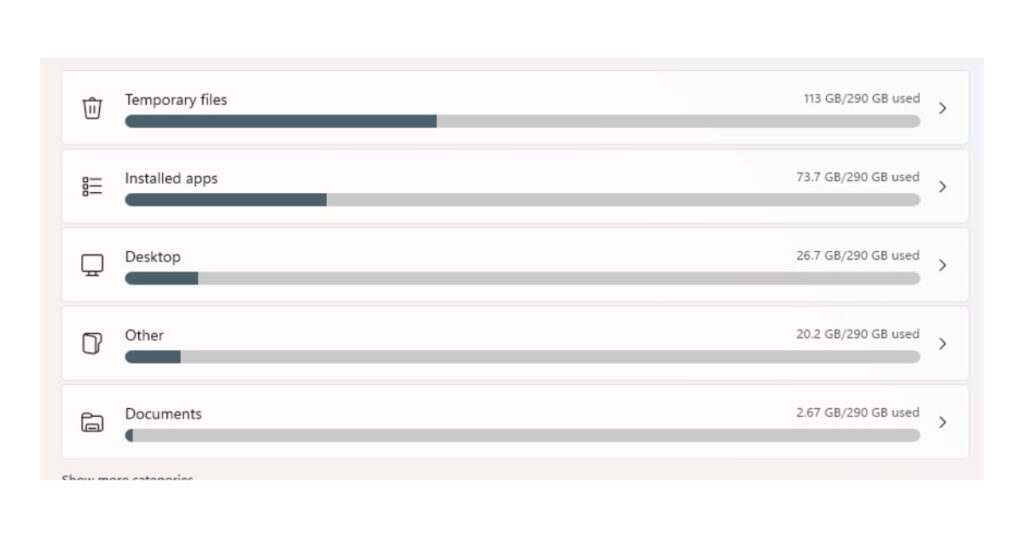
The easiest way to see what is filling up your computer is to open the Windows storage settings. Press the Windows key and I together to open Settings, then go to System, and click Storage. This page gives you a simple breakdown of what is using your space, sorted by category, like apps, temporary files, documents and system files.
Think of it like opening your closet and finally seeing everything laid out on the bed instead of shoved into corners. You can see straight away what is taking up the most room, so you know exactly where to start.
Click on any category to jump straight into managing it. This is much faster than digging through File Explorer folder by folder trying to guess what is large.
Clear out apps you do not use
In most cases, installed apps are the biggest reason your storage disappears. From the Storage page, click Installed apps, or go to Settings, then Apps, then Installed apps. Change the sort option to Size, largest first, so the biggest programs show up at the top.
Go through the list and look for anything you installed once and forgot about. Old games, trial software, or an app you tried for one project two years ago are common culprits. Click the three dot menu next to an app and choose Uninstall to remove it.
For example, say you installed a video editing app for a one time project last year and never opened it again. That single app could be sitting there using ten or more gigabytes of space for nothing. Removing a few apps like this can often free up more room than any other single step.
If you have more than one drive, some apps, especially games from the Microsoft Store, also give you the option to Move them to another drive instead of deleting them.
Delete temporary files windows keeps hidden
Windows quietly stores a lot of files in the background that you never see or use directly. These are called temporary files, and they build up over time without you noticing. To delete temporary files windows has stored, go back to the Storage page and click on Temporary files.
You will see checkboxes for things like thumbnails, delivery optimisation files, and other cache data. Click Cleanup system files to see even more categories of clutter that Windows has built up.
Here is where you need to be a little careful. The Downloads folder and Recycle Bin also show up in this list, and while they can use a lot of space, do not just tick them without checking first. Open the Recycle Bin from your desktop and quickly glance through it before emptying it, since anything you delete from there is gone for good.
Do the same quick check with your Downloads folder, since people often forget important files are sitting in there.
Reduce space used by system features
Once you have handled the easy wins, you might still want to reclaim more space, especially if you have an older laptop with a small hard drive. This is where the System and reserved section comes in, which is sometimes hidden behind a Show more categories link on the Storage page.
Two features often stand out here. The first is hibernation, which saves your open work when your laptop sleeps by using a large file called hiberfil.sys. If you never use hibernation, you can turn it off to reclaim that space. Search for Command Prompt in the Start menu, right click it, choose Run as administrator, then type powercfg /hibernate off and press Enter. You can always turn it back on later with powercfg /hibernate on.
The second is System Restore, which lets you roll your PC back if an update causes problems. Click Manage system restore, select your main drive, and choose Configure. Lowering the Max usage slider frees up space, and if you are willing to take the risk, you can delete all restore points for an instant boost. Just remember, this is more of a last resort step since it removes a safety net, not just wasted space.
Move files instead of deleting them
Sometimes you want to keep a file but you just do not have room for it locally. In that case, moving it elsewhere works just as well as deleting it.
If you have old videos taking up space, upload them to YouTube as private videos and remove the local copy. For photos, syncing them to a cloud service like Google Photos and then clearing your local copies can free up a huge chunk of space, especially if you take a lot of pictures.
If you use OneDrive, you can also set it to keep only cloud copies of files you have not opened in a while, so they stay accessible without sitting on your drive.
Just make sure anything important still has a backup somewhere else. Freeing up space should never mean losing your only copy of something valuable.
Get an external drive if you are always low on space
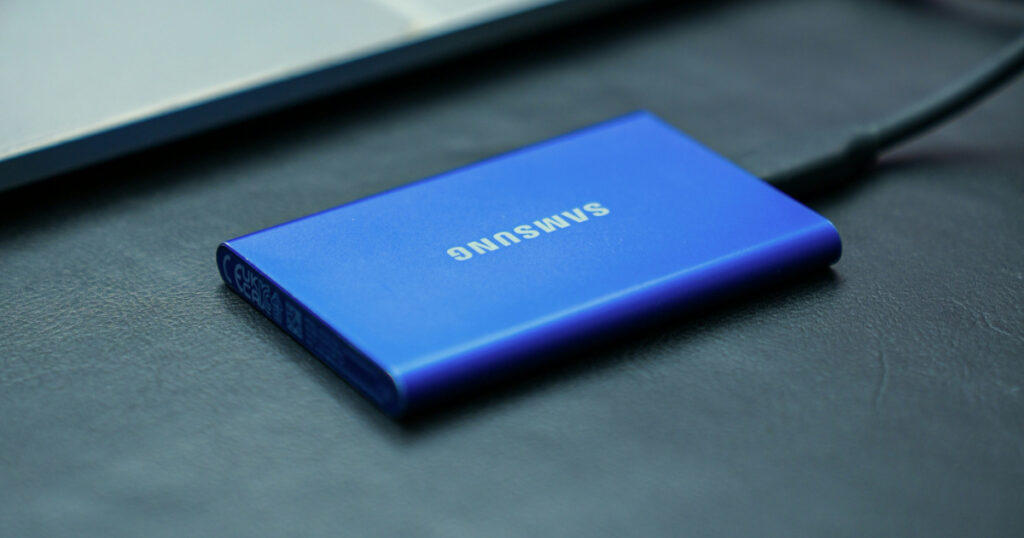
If you find yourself doing this cleanup every few months, it might just be time for more storage. An external SSD is fast and now comes in sizes over a terabyte, which takes the pressure off entirely. External hard drives are slower but cheaper, and work well for files you rarely touch, like old photo backups or archived projects. Even a simple flash drive can help if you just need to offload a few big folders.
Let storage sense windows handle it automatically
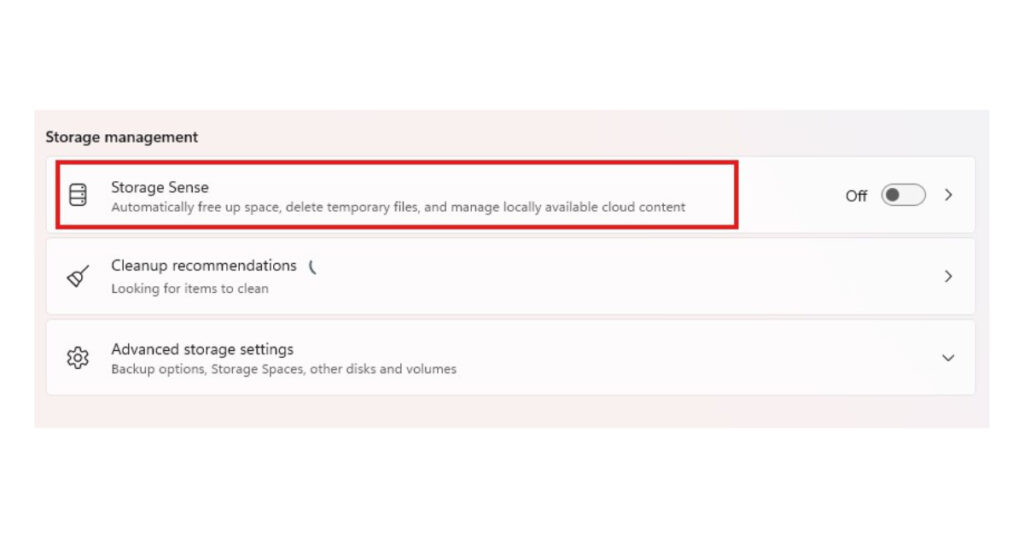
Cleaning up manually works, but it is easy to forget to do it regularly. This is where storage sense windows offers a built in feature to keep your PC tidy in the background. Go back to Settings, System, Storage, and click Storage Sense.
Turn on the option to keep Windows running smoothly, which clears temporary files on its own, and enable automatic cleanup of user content as well. You can choose to have it run only when your storage is running low, or on a regular schedule like weekly or monthly.
Just be careful with the Recycle Bin and Downloads settings inside Storage Sense, since it is possible to lose files you meant to keep if you set the timing too aggressively. A safer habit going forward is to treat your Downloads folder as a temporary landing spot, not a permanent storage location. Move anything you want to keep into a proper folder, and let Storage Sense clear out the rest without worry.
You do not need to be a tech expert to clean up computer storage on Windows. Start with the built in storage settings to see what is actually taking up space, remove apps you do not use, clear out temporary files, and move big files to the cloud or an external drive if you want to keep them without the clutter.
Turn on Storage Sense so this becomes a background habit instead of a once a year panic. A little bit of regular tidying goes a long way toward keeping your PC fast and free of that dreaded low storage warning.