How to Connect Your Site to AdSense & Apply for WordPress (Easiest Method 2026)
If you run a WordPress website or blog, Google AdSense is one of the easiest and most reliable ways to start earning money from your content. But for many beginners, the application and connection process can feel overwhelming.
Good news: it doesn’t have to be. In this step-by-step guide, we’ll walk you through the simplest method to apply for Google AdSense and connect it to your WordPress site — even if you’ve never done it before.
By the end of this guide, you’ll have your AdSense account linked to your WordPress site and be well on your way to getting approved and earning ad revenue.
What Is Google AdSense and Why Should You Use It?
Google AdSense is a free advertising programme run by Google that lets website owners earn money by displaying ads on their pages. Google matches ads to your site’s content and visitors, and you earn money every time someone views or clicks on those ads.
Here’s why AdSense is the go-to choice for WordPress bloggers:
- Free to sign up and use
- Ads are automatically matched to your content
- Google pays reliably via bank transfer or cheque
- Works on any website with quality original content
- Easy to manage through one dashboard
Before You Apply: AdSense Requirements
Google has a set of requirements your website needs to meet before you apply. Make sure you tick all the boxes below:
| # | Requirement | Details |
| 1 | Original Content | Your site must have unique, high-quality posts or pages — no copied content. |
| 2 | Privacy Policy Page | A dedicated Privacy Policy page is required by Google. |
| 3 | About & Contact Pages | Your site must feel legitimate and human — add an About and Contact page. |
| 4 | Age Requirement | You must be at least 18 years old to create an AdSense account. |
| 5 | Own Domain | A custom domain (e.g. tattwatech.com) is strongly recommended. Free subdomains may be rejected. |
| 6 | Sufficient Content | Aim for at least 15–20 posts before applying. More quality content = better chances. |
Step-by-Step: How to Apply for AdSense on WordPress
| 1 | Create a Google AdSense Account
Go to adsense.google.com and sign in with your Google account. Click ‘Get Started’ and fill in your website URL and contact details. |
Once you land on the AdSense homepage, follow these steps:
- Go to adsense.google.com
- Click the ‘Get Started’ button
- Sign in with the Google account you want to use
- Enter your website URL (e.g. https://tattwatech.com)
- Select your country and agree to the AdSense Terms & Conditions
- Click ‘Start using AdSense’
| 💡 Pro Tip: Use the same Google account you use for Google Search Console and Google Analytics for easier site management. |
| 2 | Connect Your WordPress Site to AdSense
The easiest method is to use the ‘Site Kit by Google’ plugin for WordPress. It connects AdSense, Analytics, and Search Console all in one place. |
Method A: Using the Site Kit by Google Plugin (Recommended)
Site Kit is Google’s official WordPress plugin and by far the easiest way to connect your site to AdSense. Here’s how:
- Go to your WordPress Dashboard
- Navigate to Plugins > Add New
- Search for ‘Site Kit by Google’
- Click ‘Install Now’, then ‘Activate’
- Click ‘Start Setup’ and sign in with your Google account
- Grant the required permissions when prompted
- Connect Google Search Console first (it’s the first step in the wizard)
- Once Search Console is connected, go to Site Kit > Dashboard
- Click ‘Connect More Services’ and select AdSense
- Sign in to AdSense and grant access
- Site Kit will automatically insert your AdSense code across your site
| ⚠️ Important: Make sure you use the same Google account that is linked to your AdSense application. Using a different account will cause connection errors. |
Method B: Manually Adding the AdSense Code
If you prefer not to use a plugin, you can add the AdSense code manually:
- In your AdSense dashboard, go to Ads > Overview
- Click ‘Get code’ to copy your unique AdSense script tag
- In WordPress, go to Appearance > Theme Editor (or use a plugin like ‘Insert Headers and Footers’)
- Paste the AdSense code just before the </head> tag in your theme’s header.php
- Click ‘Update File’ to save
| 💡 Pro Tip: Using the ‘Insert Headers and Footers’ plugin is safer than editing theme files directly, as it won’t be overwritten when you update your theme. |
| 3 | Verify Your Site Ownership
Google needs to confirm you own the site. This is usually done automatically via Site Kit, or by inserting a meta tag into your site’s header. |
If you’re using Site Kit, site verification happens automatically during setup. If you’re connecting manually:
- In your AdSense dashboard, look for the site verification prompt
- Copy the meta verification tag provided
- Paste it into your site’s <head> section (via Insert Headers and Footers plugin or theme editor)
- Return to AdSense and click ‘Verify’
| 4 | Enable Auto Ads (Recommended for Beginners)
Auto Ads let Google automatically place ads in the best positions on your site. It’s the simplest and most effective setup for new publishers. |
- In your AdSense dashboard, go to Ads > Overview
- Click on your site name
- Toggle ‘Auto ads’ to ON
- Customise which ad formats you want (display ads, in-article ads, etc.)
- Click ‘Apply to site’
- Wait up to 1 hour for ads to start showing
| 💡 Pro Tip: Auto Ads use Google’s AI to find the best ad placements on your site, maximising your revenue without any manual work. |
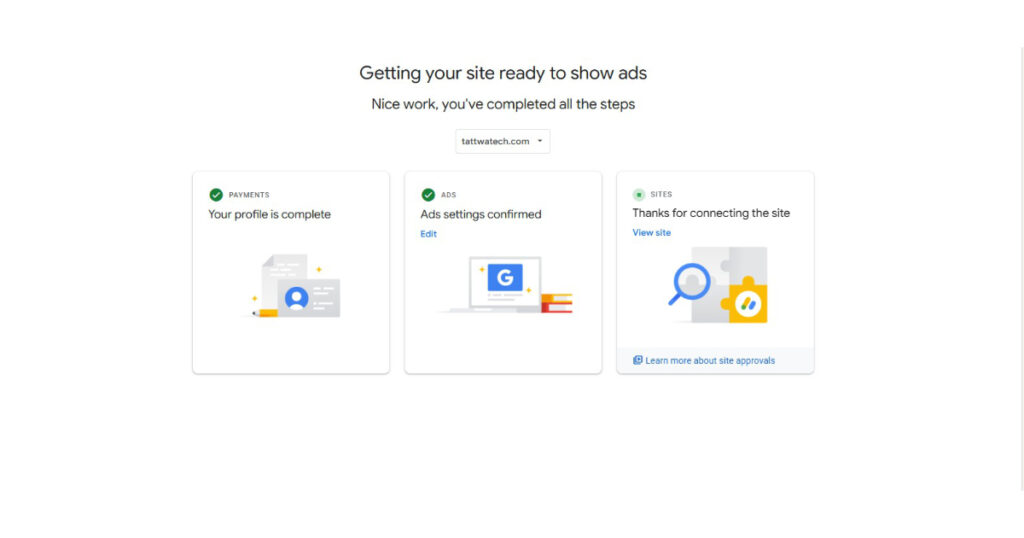
| 5 | Submit Your Site for Review
Once your site is connected and the AdSense code is in place, submit your site for review inside the AdSense dashboard. |
After connecting your site:
- Go to your AdSense dashboard and look for the ‘Sites’ section
- Your site should be listed — check its status
- If it says ‘Needs attention’ or ‘Ready’, click to submit for review
- AdSense will review your site (usually takes 1–3 days, sometimes up to 2 weeks)
- You will receive an email once your site is approved or if changes are needed
| ⚠️ Important: Do not click on your own ads at any time. Doing so is a violation of Google’s AdSense policies and can result in your account being permanently banned. |
Tips to Get AdSense Approved Faster
Getting approved can take time. Here are the most effective ways to improve your chances:
- Write high-quality, original content that is at least 600–800 words per post
- Have a clear site navigation menu with visible links
- Add a Privacy Policy, About Us, and Contact Us page
- Avoid any copyrighted images or content you don’t own
- Make sure your site is mobile-friendly
- Remove any broken links or error pages
- Ensure your site loads quickly (use caching plugins like WP Rocket or LiteSpeed Cache)
- Don’t use any other ad networks before AdSense approval
- Apply when your site is fully set up — not when it’s still under construction
Common Issues and How to Fix Them
| Problem | Solution |
| Ads not showing after approval | Wait up to 48 hours. Check that Auto Ads is enabled and the AdSense code is correctly installed on all pages. |
| Site not verified | Make sure the AdSense code is in the <head> section of every page. Try clearing your cache and re-verifying. |
| Application rejected | Review Google’s policies. Common reasons include insufficient content, policy violations, or an incomplete site. |
| Site Kit not connecting | Ensure you’re logged into the same Google account used for AdSense. Try disconnecting and reconnecting the service. |
| AdSense code missing from some pages | Use Auto Ads or install the Insert Headers and Footers plugin to ensure the code appears on all pages site-wide. |
Conclusion
Connecting your WordPress site to Google AdSense is one of the smartest first steps you can take toward monetising your blog. With the Site Kit by Google plugin, the process is straightforward and takes less than 15 minutes.
To recap what you need to do:
- Make sure your site meets Google’s content and policy requirements
- Create a Google AdSense account at adsense.google.com
- Install Site Kit by Google on WordPress and connect AdSense
- Enable Auto Ads and let Google place ads automatically
- Submit your site for review and wait for approval
Once approved, you’ll start seeing ads on your site and your earnings will be tracked in your AdSense dashboard. The more traffic you drive to your site, the more you can earn.
| Found this guide helpful?
Share it with someone who wants to monetise their WordPress site. For more how-to guides, visit tattwatech.com |
Frequently Asked Questions (FAQ)
Q: How long does AdSense approval take? Google typically reviews your site within 1–3 business days, but it can take up to 2–4 weeks in some cases.
Q: Can I use AdSense on a free WordPress.com site? No. AdSense requires a self-hosted WordPress site (WordPress.org) with your own domain. Free .wordpress.com subdomains are not accepted.
Q: Do I need a minimum amount of traffic to get approved? Google doesn’t officially state a minimum traffic requirement, but having consistent traffic from search engines improves your chances.
Q: Can I use AdSense alongside other ad networks? Yes, once approved. You can combine AdSense with other networks like Ezoic or Mediavine, as long as you follow AdSense policies.
Q: Will ads slow down my WordPress site? Auto Ads use asynchronous loading, so they have minimal impact on page speed. However, too many manual ad units can slow your site.
Q: What is the minimum payout threshold for AdSense? Google pays out once your account balance reaches $100 (or the equivalent in your local currency).